
✨ This article was AI edited. Editorial responsibility: SabriNasSinlessSecrets.com.
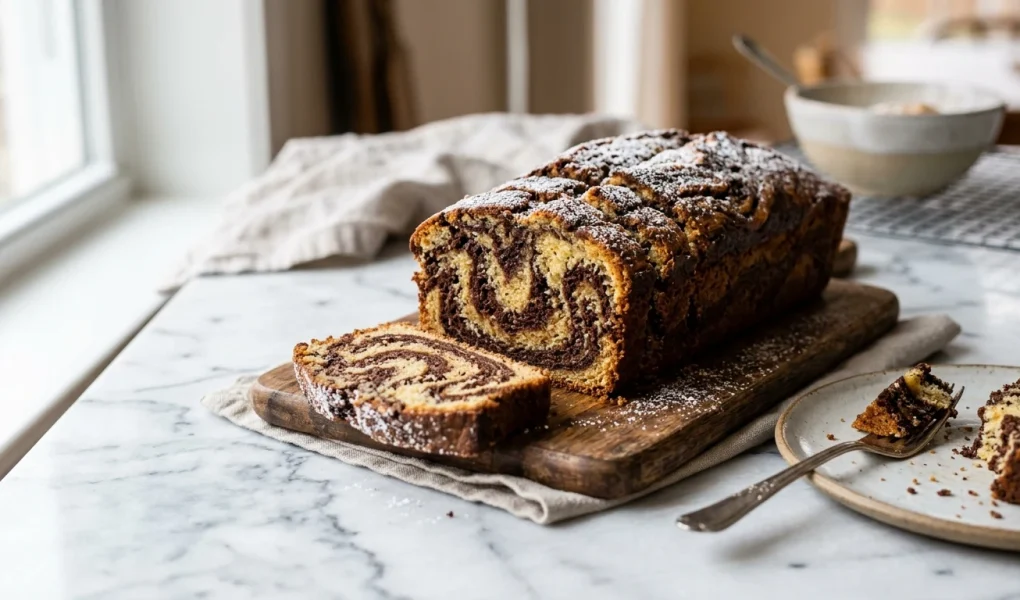
Few baked confections inspire as much nostalgic wonder as a classic bakery-style marble cake, with its hypnotic swirls of golden vanilla and deep Dutch cocoa crumb. However, if you have ever attempted to convert a traditional recipe without wheat, you know the heartbreak of a dry, crumbly, or rubbery result. If you have been searching for an authentic, foolproof migic marble cake gf recipe (our beloved gluten-free magic marble cake), you have arrived at your ultimate baking sanctuary.
At Sabrina’s Sinless Secrets, our pastry philosophy marries strict gluten-free food science with clean, uncompromised indulgence. This tested showstopper delivers a tender, velvet-soft crumb that stays delightfully moist for days, featuring a glossy dark chocolate swirl that holds its shape beautifully without sinking to the bottom of the pan.
Table of Contents
- The Food Science of Gluten-Free Cake Moisture & Structure
- Essential Ingredients for the Perfect Gluten-Free Marble Loaf
- Step-by-Step Method: The Art of the “Magic” Swirl
- Macronutrient Breakdown & Nutritional Analysis
- Troubleshooting Common Gluten-Free Baking Hurdles
- Frequently Asked Questions About Gluten-Free Magic Marble Cake
The Food Science of Gluten-Free Cake Moisture & Structure
In traditional baking, wheat flour contains glutenin and gliadin—two proteins that hydrate and bond to form an elastic gluten network. This web traps expanding carbon dioxide gas from leavening agents, creating lift and structural resilience. When baking gluten-free, the absence of this protein matrix often causes cakes to either collapse into dense gummy pockets or dry out into a sandy, fragile crumb.
To overcome these biochemical challenges and achieve a truly “magic” crumb, this recipe relies on three precise structural pillars:
- A Balanced Multi-Grain & Starch Matrix: We combine superfine brown rice flour (for structure and neutral flavor), sweet white rice flour (for binding), potato starch (for lightness), and tapioca starch (for chew and moisture retention). Pre-blended commercial 1:1 gluten-free baking flours with xanthan gum (such as Bob’s Red Mill 1-to-1 or King Arthur Measure for Measure) provide an ideal balanced ratio.
- High-Hydration Fat Emulsion: Gluten-free flours absorb significantly more liquid and lipid volume than all-purpose wheat flour. By incorporating both room-temperature cultured grass-fed butter (for rich flavor and aeration during creaming) and cold-pressed avocado oil (for lasting moisture retention at room temperature), the cake resists staling.
- Sour Cream or Greek Yogurt Acidification: Full-fat sour cream (or dairy-free coconut yogurt) introduces lactic acid, which gently tenderizes starches, relaxes protein chains, and lowers crumb pH to produce a delicate, melt-in-your-mouth texture.
| Ingredient Function | Standard Wheat Marble Cake | Our Sinless GF Magic Marble Cake | Structural Purpose in GF Matrix |
|---|---|---|---|
| Flour Base | All-purpose wheat flour | 1:1 Gluten-free baking blend + almond flour | Almond flour adds natural lipids, preventing dryness |
| Structural Binder | Natural wheat gluten | Xanthan gum + whole pasture-raised eggs | Traps air bubbles during the bake for reliable rise |
| Moisture Retention | Butter alone | Butter + avocado oil + Greek yogurt | Dual-phase lipid system prevents moisture evaporation |
| Chocolate Component | Melted baking chocolate chips | Dutch cocoa powder bloomed in hot espresso/milk | Matches batter density so swirls never sink |
Essential Ingredients for the Perfect Gluten-Free Marble Loaf
To ensure bakery-caliber success, measure your ingredients accurately (preferably using a digital gram scale):
- 2 cups (280g) 1:1 Gluten-Free Measure-for-Measure Baking Flour: Containing xanthan gum.
- 1/2 cup (50g) Superfine Blanched Almond Flour: Adds essential natural moisture and fine crumb texture.
- 1.5 tsp Aluminum-Free Baking Powder & 1/2 tsp Baking Soda: Provides optimal double-acting lift.
- 1/2 tsp Fine Sea Salt: Balances sweetness and sharpens cocoa notes.
- 1/2 cup (115g) Unsalted Butter: Softened to room temperature (approx 68°F / 20°C).
- 1/4 cup (60ml) Neutral Avocado Oil: Keeps crumb soft even when chilled.
- 1 cup (200g) Organic Cane Sugar: (Or granulated monk fruit sweetener for a keto/low-sugar version).
- 3 Large Pasture-Raised Eggs: Brought to room temperature in a bowl of warm water for 10 minutes.
- 2 tsp Pure Bourbon Vanilla Extract: Use high-grade vanilla for distinct floral notes.
- 1/2 cup (120g) Full-Fat Sour Cream or Greek Yogurt: Room temperature.
- 1/4 cup (60ml) Whole Milk or Almond Milk: Room temperature.
The Blooming Dutch Chocolate Swirl Paste:
- 1/3 cup (35g) Dutch-Processed Unsweetened Cocoa Powder: Sifted.
- 1/4 cup (60ml) Hot Brewed Espresso or Boiling Water: “Blooms” the cocoa, releasing deep chocolate notes.
- 2 tbsp Pure Maple Syrup or Warm Milk: Adjusts consistency so the chocolate batter matches the vanilla batter density.
Step-by-Step Method: The Art of the “Magic” Swirl
Follow these precise steps to ensure an effortless, showstopping swirl pattern:
- Preheat & Prep the Pan: Preheat your oven to 350°F (175°C). Line an 8.5 x 4.5-inch metal loaf pan with parchment paper, leaving an overhang on the two longer sides to create a convenient sling for easy removal later. Lightly grease the exposed ends with avocado oil.
- Whisk the Dry Matrix: In a medium mixing bowl, vigorously whisk together the 1:1 gluten-free flour, blanched almond flour, baking powder, baking soda, and fine sea salt until completely aerated and lump-free.
- Cream Butter, Oil, and Sugar: In a stand mixer fitted with the paddle attachment (or using an electric hand mixer), beat the softened butter, avocado oil, and cane sugar on medium-high speed for 4 to 5 full minutes. The mixture should become visibly pale, voluminous, and fluffy.
- Incorporate Eggs & Aromatics: Add the room-temperature eggs one at a time, beating thoroughly after each addition for 30 seconds to establish a stable emulsion. Scrape down the bowl sides. Stir in the vanilla extract, sour cream (or Greek yogurt), and room-temperature milk until smooth.
- Fold Batter & Rest: Reduce mixer speed to low. Gently add the dry flour blend in two batches, mixing just until no dry flour streaks remain. Crucial Gluten-Free Step: Allow the batter to sit undisturbed in the bowl for 10 minutes before panning. This resting phase allows the starches to fully hydrate, eliminating gritty graininess.
- Prepare the Chocolate Swirl: While the batter rests, whisk the sifted Dutch cocoa powder, hot espresso (or boiling water), and maple syrup in a small bowl into a glossy, pourable paste. Scoop 1 heaping cup of the vanilla batter into the bowl with the chocolate paste. Gently fold together until uniform in color.
- Layer and Swirl Technique: Dollop alternating large scoops of vanilla and chocolate batter into the prepared loaf pan (checkerboard pattern). Tap the pan gently on the counter to settle the layers. Take a butter knife or wooden skewer, insert it straight down to the bottom of the pan, and trace a continuous figure-8 pattern through the batter from top to bottom. Do not over-swirl, or the distinct marbling will blend into a murky brown cake!
- Bake to Golden Perfection: Bake at 350°F (175°C) on the center oven rack for 50 to 58 minutes. A wooden toothpick inserted into the center should emerge clean or with a few moist crumbs attached (no wet batter).
- Cool Completely: Allow the cake to cool in the loaf pan on a wire rack for 15 minutes. Use the parchment sling to gently lift the cake onto the rack to cool completely to room temperature before slicing. Slicing warm gluten-free cake can cause fragile starches to compress.
Macronutrient Breakdown & Nutritional Analysis
Each satisfying 1-inch slice (recipe yields 10 generous slices) delivers balanced macros with significantly lower glycemic impact than conventional bakery cakes:
| Nutritional Component | Amount Per Slice | % Daily Value |
|---|---|---|
| Calories | 295 kcal | 15% |
| Protein | 6 grams | 12% |
| Total Fat | 14 grams | 18% |
| Saturated Fat | 6 grams | 30% |
| Monounsaturated Fat | 6 grams | – |
| Carbohydrates | 37 grams | 13% |
| Dietary Fiber | 2.5 grams | 10% |
| Sugars | 18 grams | – |
| Calcium | 65 mg | 6% |
| Iron | 1.8 mg | 10% |
Troubleshooting Common Gluten-Free Baking Hurdles
Baking without gluten has unique physics. Here is how to diagnose and prevent common issues:
- The Cake Sinks in the Middle: This usually stems from under-baking or opening the oven door too early in the bake cycle. Gluten-free cakes require sufficient internal heat setting before the door is cracked. Alternatively, ensure your baking powder is fresh and not expired.
- The Crumb Is Crumbly or Dry: Make sure you allowed the batter to rest for 10 minutes prior to baking so starches hydrated. Also, verify that your 1:1 flour blend contains xanthan gum; without a gum binder, gluten-free baked goods cannot hold their crumb structure.
- The Chocolate Swirl Sank to the Bottom: This happens when the chocolate portion of the batter is significantly denser or heavier than the vanilla portion. Blooming the cocoa powder with warm espresso and liquid maple syrup ensures both batters have identical specific gravity.
Frequently Asked Questions About Gluten-Free Magic Marble Cake
Can I make this cake dairy-free?
Yes, seamlessly! Substitute the dairy butter with a high-quality vegan block butter (such as Miyoko’s or Country Crock Plant Butter), use unsweetened plain coconut yogurt instead of sour cream, and use unsweetened almond or oat milk.
Can I bake this as marble muffins instead of a loaf?
Absolutely! Line a 12-cup standard muffin tin with paper liners. Distribute alternating spoonfuls of vanilla and chocolate batter into the cups, filling them three-quarters full. Swirl with a toothpick and bake at 350°F (175°C) for 18 to 22 minutes.
How should I store leftovers?
Wrap the completely cooled loaf tightly in parchment paper followed by foil, or store in an airtight cake dome at room temperature for up to 3 days. For longer storage, slice the loaf and freeze individual slices separated by parchment paper in a freezer bag for up to 2 months. Reheat a slice in the microwave for 15 seconds for that fresh-out-of-the-oven aroma!
What is the difference between Dutch-process and natural cocoa powder?
Dutch-processed cocoa is treated with an alkalizing agent to reduce natural acidity, resulting in a darker, richer mahogany color and a smoother, less bitter chocolate flavor. In this recipe, Dutch cocoa creates stunning color contrast against the pale vanilla batter.
Get our latest guides, news, and insights highlighted in your Google Search & AI Overviews.


